PREREQUISITES - MUST READ:
The first prerequisite is you or someone at your company must have a basic knowledge of IIS to be able to install this application on a web server. If you do not know IIS, this is not something we can teach. Get with your IIS administrator to install the application. Once installed, anyone that is familiar with Crystal Reports will understand how to configure the reports for Web Portal.
You can install Web Portal on Windows Server 2012, 2016, 2019, 2022, 2025, or later. We do not support installing or running Web Portal on a desktop PC. This defeats the purpose of running a server application.
While we can't support the installation of IIS and ASP.Net, we DID outline the steps we took installing/enabling IIS and ASP.Net on Windows Server 2019 (these instructions also work for 2016 or 2022 or 2025). If you're starting with a fresh server (like one just "spun up" on AWS), do the following:
Whether your Windows Server is new or not, ensure that ASP.Net is installed/enabled on the server. This is a server setting (it's not the same as installing .Net Framework). Installing/enabling ASP.Net is covered in the KB article above regarding setting up a new Windows Server.
---
Web Portal is not an overly complicated application, but it is important you use this installation guide and follow each step. There are a lot of parts that work together beautifully, but each piece must be there. There is more to do than simply run the installers and type in a URL.
Do the following FIRST, before installing Web Portal:
---
UPGRADING FROM A PREVIOUS RELEASE?
Backup your entire Web Portal install files and directories in C:\inetpub\www\YourWebPortalDirectory; if you've made custom CSS changes, those will normally need to be re-done. If you have any issues re-doing your CSS changes, if you have a backup, we can easily help you merge old settings with new settings.
---
LOOKING FOR RELEASE NOTES?
---
I. INSTALLING WEB PORTAL:
Have you installed Report Runner Batch and Report Runner Event Server on the same machine yet? If not, go back to PREREQUISITES.
Important! If you are a network administrator installing Web Portal for someone else in your company who will be administrating it, it is HIGHLY recommended they sit with you while you install the application. There are NUMEROUS directories that the Web Portal administrator needs to know about and USE. These directories must be written down so the Web Portal administrator knows where to find them later.
Installation of Report Runner Web Portal is simple and straightforward. Following is a list of steps, one-by-one, that will take you from beginning to end:
1) Download the software via the link sent to you in email (it's not publicly posted on our website)
2) Run the setup executable name Report_Runner_Web_Portal_Setup.exe
Note: If running in an environment where your machine is "locked down", you will need to use the "Run As Administrator" function or if on a Terminal Server (RDP), use "Install Terminal Server Application" from the Control Panel. 
3) This is the first window you will see (after initialization process) 
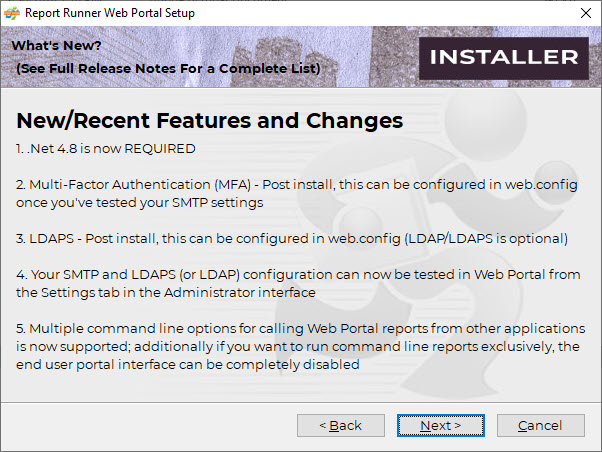
4) Next, new and/or recent changes will be shown, and click Next
5) Next, read the Happiness Disclaimer, and click Next 
6) Enter your IIS website directory (do not use spaces within this folder), and click Next 
7) Enter your Report Runner data folder (default should normally be used), and click Next
Note: This directory MUST ALREADY EXIST (because you previously installed Report Runner Batch and Report Runner Event Server). You will not be able to continue unless the directory is there. Within the existing Report Runner Batch\AppData\Event Server directory, this installer will add a WebTemplates directory. This is where your report Web Templates will need to be moved/saved from Report Runner Batch or where they are auto-generated when you add RPTs to the Input queue of Event Server (more on this later). These "Batch" XML templates are used to configure your web reports.
NOTE: Reread previous note (a common question is "Where do I put my web templates?") -- You will also be reminded again later.
8) Select the Portal skin/color you would like to start off with initially (this can be changed later). Most customers go with "Modern" or "Microsoft" to start out with. As noted on the installation screenshot below, we are happy to help you customize your Web Portal's customer-facing interface to match your company's branding. 
9) Enter your company name. 
10) Configure your mail settings. In the user-facing application, the user can change their login password. These mail settings are only used to send these emails (when login password is changed).
NOTE: The Web Portal report emails are sent using the Report Runner Batch mail settings (not the settings below). 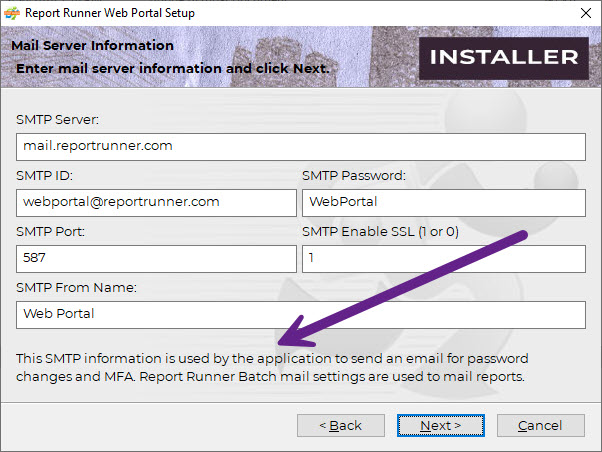
11) You are ready to INSTALL; this is your final confirmation before files start being copied; click >>INSTALL>> to begin 
12) This is what you will see while the files are installing 
13) Once the installation is complete (after the main files are copied), you will see a message about setting and configuring IIS. The application should be set up as an .NET 4 application (which is the default application pool for modern servers).
NOTE: The ADMIN interface/the jnAdmin folder (which has all the ASP pages for creating/editing reports and users) is not protected by default. You can easily configure a web portal administrator password in the web.config file (AdminPassword). It times out after 30 minutes (and you can configure that). 
Additional pop-up reminder of what has to be done after the installer completes. 

14) Installation is complete, and click Finish
Note: Write down the Picklist and Web Templates directories listed below. The Web Portal Administrator needs to know where these directories are located.
Note: Write down the Picklist and Web Templates directories listed below. The Web Portal Administrator needs to know where these directories are located.
Note: Write down the Picklist and Web Templates directories listed below. The Web Portal Administrator needs to know where these directories are located. 
15. SET FULL PERMISSIONS ON FOR ALL USERS. Go to the main Web Portal directory (C:\inetpubs\ReportRunnerWebPortal by default). Right click on this directory. Make sure no files are flagged Read Only, and turn on FULL CONTROL permission for all users; Properties, Security, Edit; click on all groups and user names and check/select Full Control and Apply. Do NOT proceed until you have done this. 

![]()


16. Start IIS (Start, Windows Administrative Tools, IIS Manager) 
- Expand Machine, Sites, expand Default Web Site, and you'll see ReportRunnerWebPortal listed
- Right-Click on ReportRunnerWebPortal, Convert to Application (default application pool should be .Net 4 which is what you want); Click OK to confirm 

17. If you are on Windows 2016, 2019, 2022, 2025, or later, edit the web.config file in the main Web Portal directory. There is a line in it you need to delete/remove. If you do not do this, the formatting of the portal will not look correct.
Note, as of 2030.5z, the installer SHOULD add or remove this mime setting if necessary. It should NOT need to be MANUALLY removed anymore. Should you have any issues, please add or remove it as needed, though.
DELETE THE MIMEMAP LINE SHOWN: 

Save your changes to the web.config file.
---
IMPORTANT DIRECTORIES TO BE AWARE OF:
1) Free category icons directory. We've made over 150 free category icons available. You can create custom report categories and select any of these perfectly designed and matching icons. ![]()
2) Picklists directory. This directory is where you place any custom picklists you create to assign to parameters. The Web Portal is unable to load the SQL-based dynamic parameters directly your Crystal Reports, so we allow you to create picklists external to Web Portal and assign them to parameters. Picklists can be static, single value or show one value but set another, cascading, or SQL-based. Our Cascading parameters can fully duplicate all of the functionality within Crystal Reports parameters. There are a number of pre-defined picklists in this directory, and you'll figure out the syntax of these picklists quickly. Also note, the beginning names of the picklists matter, too. The names are used to determine how Web Portal reads the picklist format. This text-based picklist technique is simple and elegant all-in-one. Picklist configuration is discussed more below in the "Configuring Web Portal" section. 
3) "New" Report templates directory. This directory is where you can place any NEW reports that you want to run in the Web Portal. This will allow you to browse to these reports when you're ready to add a new report.
Please note, alternatively (and our recommended technique), you can "throw" all RPT files for Web Portal into the Input queue of Event Server, and Event Server will automatically create Web Portal templates for each report. As a bonus, when these RPTs are processed, any static parameter selections found in the report will be used to create auto-picklist text files to be used within Web Portal (more on this later).
The login ID/password assigned to the reports in this "Input Queue" process will be the Global ID/password from Report Runner Batch. If your reports do not require an ID/password, you can either leave the Global ID/Password blank or literally set them both to "jnnothing" (without quotes). Any other kind of custom login information will require you editing the XML files (Web Templates) manually from Report Runner Batch. 
---
MODIFYING WEB.CONFIG SETTINGS:
All of your Web Portal-specific settings are stored in the web.config file, found in c:\inetpub\www\YourWebPortalDirectory. Towards the top, you will see various paths defined, which the installer takes care of setting. There are some additional settings that you can toggle features on or off by editing the web.config file manually. Most of the settings in web.config have comments/notes above them that explain how to modify them.
Here are a few examples of modifications for key features (full web.config documentation can be found here):
1) Turn on Active Directory support (optionally). Simply change the 0 to a 1 to enable. Set your LDAP/AD directory or you can comment out that line to tell Web Portal to use default AD directory. Turning on AD support will DISABLE the Groups and Users tabs within the ADMIN interface. Your report groups will now list your AD groups, and you can assign them to the reports. And of course, when your end users log in to the application, they will use their AD credentials.
Configure LDAPS (usually over port 636):
- LDAPS_Server - set this to the domain only (do NOT preface with LDAPS) - EX: whatever.ldap.knownkeep.net
- LDAPS_BaseDN - set this to your base/root DN - EX: DC=ldap,DC=knownkeep,DC=net
- LDAPS_Port - set this to the LDAPS port - EX: 636
- LDAPS_UserName - set this to the ADMINISTRATOR ID - EX: administrator@ldap.knownkeep.net (UPN format)
- LDAPS_Password - set this to your ADMINISTRATOR Password
- LDAPS_UPN_Domain - set this to your UPN domain (this gets appended to your end user's login ID) - EX: ldap.knownkeep.net
... or ...
Configure LDAP (usually over port 389 -- append to LDAP root URL if different than 389):
- ADDomainPath - set this to your LDAP domain (preface with LDAP just like example) - EX: LDAP://localhost/OU=RR,DC=reportrunnerserver,DC=com
- ADUserName - set this to the ADMINISTRATOR ID - EX: administrator (D-LLN format)
- ADPassword - set this to your ADMINISTRATOR Password
- ADGroupFilter - set this to wildcarded value to filter what groups are returned - EX: *reports* or something like rr* or something like businessgroup*

Please note the two different ID formats for LDAPS (UPN) and LDAP (D-LLN) discussed here:
https://learn.microsoft.com/en-us/windows/win32/secauthn/user-name-formats
2) Modify the parameter date format (optionally). Do not change this just for the fun of it, to see it displayed a different way. Change it only if the date format we are passing to the report needs to be formatted another way. 
3) Modify mail settings. When you ran the installer, you entered your mail settings for sending password notifications. The installer created these settings in web.config. If you need to change these settings later, you can change them here. Note, THESE mail settings are ONLY for sending password resets. It is NOT the mail settings for sending report output to user (that is done within the Report Runner Batch engine and you configure the mail server there). 
---
OTHER NOTEWORTHY OPTIONAL WEB.CONFIG SETTINGS:
Note: These settings are normally NOT modified or changed from their default settings. We are simply explaining how to use them if you choose to.
1) ShowPasswordInBrowseList - By default, password settings are hidden in the ADMIN interface. Use this setting to show them.
2) InstanceNamingFormat - Use this setting to set the default instance naming format
3) UseWPLoginForDatabaseLogin - By default, report login information for database access is stored in the Web Portal (Batch) XML template. Enable this setting to use the same Web Portal login ID and password for report database access, too.
4) WebPortalURL - If you plan on using the command line feature of Web Portal (calling URLs to run reports without user interaction), there is a key called "webportalurl" that you need to set. We do not automatically set it, because you may want to use a different URL for external display. When you generate a command line to call a report, this URL will be used.
---
STARTING AND VERIFYING YOUR WEB PORTAL INSTALLATION:
1) Start your ADMIN interface:
http://localhost/ReportRunnerWebPortal/JNAdmin/ReportList.aspx
or
http://YourServerURL/YourWebPortalDirectory/JNAdmin/ReportList.aspx 
Note: Sample ADMIN interface from our Web Portal demo server can be seen here -- http://admin.reportrunner.com
2) Start your END USER interface:
http://localhost/ReportRunnerWebPortal/Login.aspx
or
http://YourServerURL/YourWebPortalDirectory/login.aspx 
Note: Sample END USER interface from our Web Portal demo server can be seen here -- http://reports.reportrunner.com
Does your Web Portal load (look) correct?
(A) Are you getting this 404.3 error?
If you're getting a 404.3 error, more-than-likely you do not have ASP.Net installed/enabled on your server (and IIS doesn't understand how to process an ASPX web page). To fix this, see this KB article on configuring a new Windows Server for Web Portal to run:
(B) Does it look like this? If the portal looks wrong/broken (like screenshot below)... 
...do the following:
Edit the web.config (using Notepad) in the main Web Portal directory (C:\inetpub\wwwroot\ReportRunnerWebPortal) and DELETE this line:
<mimeMap fileExtension=".less" mimeType="text/css" />
NOTE: On some older servers like 2012 and previous, this mimeMap setting is normally needed and should not be deleted.
Refresh the previously "broken" Web Portal URLs and they should now display correctly.
(C) Everything looks like it's working? Continue on...
3. If using the default installation, you can go to ADMIN interface (previously shown/started above -- you started both the ADMIN and the End User interface). We're now going to configure a quick test report and make sure everything is "hooked up" correctly.
Add Report (click New Report), drop-down template should show TEST.XML; choose this template, name the new report "TEST", set/select group permissions (to Demo and Everyone) and SAVE it. This TEST.XML uses our batch message Crystal RPT report which will simply run a test report and allow you to enter a parameter.

Select the TEST.XML template

Name the new report "TEST"

Select the Groups (we are setting Group permissions) 
Save the new "TEST" report 
Did the report save correctly and go back to the main "Reports" menu tab?
Note, if you SAVE and it does nothing (it should save and exit), then you did not set FULL PERMISSIONS for all users on the Web Portal folder correctly.
Go BACK to the permissions step and set FULL permissions for the Web Portal directory for ALL users.

4. Congrats! You've created your first Web Portal report. Now let's test it...
Go to END USER interface, log in with demo/demo, run TEST report (whatever you named it). It should have one parameter, enter whatever you want (like "Hello World!"), run it to Screen. It should show a PDF (via popping up to a new tab) with whatever you typed. If you don't see PDF, make sure pop-ups are allowed for localhost.
Remember: You will not able to email a report from Web Portal until you configure the email settings within Report Runner Batch. Once email tests correctly there, email should work just fine from Web Portal.
Login with demo/demo 
Select TEST report 
Enter/answer the parameter "Hello World!" (or anything else you want to type) 
Click Submit to run the report 
Web Portal now makes a copy of the TEST.XML template, edits it with your parameter value, sets a unique output file name, and "throws" it into the Input Queue for Event Server to see it and run it 
Did you get an error? If so, find the log file in the Report Runner Batch log file directory or open the Report Runner Event Server monitor (right-click in system tray on Event Server icon -- this is the Event Server Controller). When monitor opens, you'll see a RED line in the Error queue. You can double-click it to open the log file that goes with it.
Is it just spinning and spinning for minutes without completing? If so, then the Report Runner Event Server service has not been started. You can either start it from the Event Server Controller or go directly to your Windows Services interface and start it there. 
If it worked, then you should see a tab open up and show the PDF file! 
Back to the Web Portal tab, you should see a "Report Complete" message. You can click Return to go back to your report list. 
If you see the "Report Complete" message, but the report did not open up, then your browser is blocking pop-ups. Just click the "blocked pop-up" icon and select to Always Allow pop-ups (or some other similar message). 

That's it! Web Portal is installed!
---
WHERE IS THE USER MANUAL?
https://docs.knownkeep.com/books/web-portal-manual
---
FINAL QUESTIONS:
Q: How many users can access Web Portal?
A: It's unlimited. You can set up an unlimited number of named users. They can all access the Web Portal at once. We do not limit users in any way.
Q: How many users can be logged in at one time running reports?
A: It's unlimited. Live reports will run in the order the reports were submitted. Event Server processes report requests in the background. You can configure Event Server to run up to twenty (20) reports at a time. How many you set this to depends completely on your server power and configuration. End users will never get a messages stating "too many report requests" or "licenses exceeded". We simply queue up the reports and run them one-by-one.
Q: Are static-type report requests or instances "queued up" in the order received?
A: No, they are processed/opened immediately. Event Server does not need to do anything with these types of requests. They are already processed.
Q: The reports seem to be running, but they are not displaying afterwards. It shows "Report Complete". What's the problem?
A: You have pop-ups blocked. You must instruct any users to enable pop-ups in their browser. Please note, many (all?) browsers have a pop-up blocker AND many devices have additional pop-up blocking software. If the report is not displaying after completing, it is your pop-up blocker.
Q: Reports will not finish (the gears just keep turning) or I get an error message. How can I fix this?
A: https://help.reportrunner.com/knowledgebase/article/how-to-debug-web-portal-report-runner-errors-and-issues
Q: Where's the User Manual? I can't figure how to use Web Portal.
A: https://docs.knownkeep.com/books/web-portal-manual
---
That's it! Please let us know if you have any additional questions. We are always here to help!